9 Full-Body Postpartum Exercises for Recovery
9 Full-Body Postpartum Exercises for Recovery
Recovering after childbirth involves rebuilding strength, improving core stability, and supporting your pelvic floor. This guide outlines nine exercises designed to help you regain balance, reduce discomfort, and ease back into daily activities safely. Key highlights include:
- Start with diaphragmatic breathing to reconnect with your core and manage intra-abdominal pressure.
- Focus on low-impact movements like glute bridges, bird dog, and wall push-ups to build strength gradually.
- Progress carefully with exercises like squats, side planks, and resistance rows as your recovery advances.
- Monitor your body for signs like abdominal doming, pelvic pressure, or leakage, and adjust accordingly.
- Incorporate cooldown stretches like Cat-Cow and Child's Pose to release tension and improve mobility.
Always get medical clearance before starting any postpartum exercise routine, and stop if you experience pain, bleeding, or other concerning symptoms. Gradual progression and proper form are essential for a safe recovery.
30-Minute Full Body STRENGTH | Postpartum Workout (Dumbbells + DR Safe Abs and Core)
sbb-itb-9ce2258
How to Use These Exercises
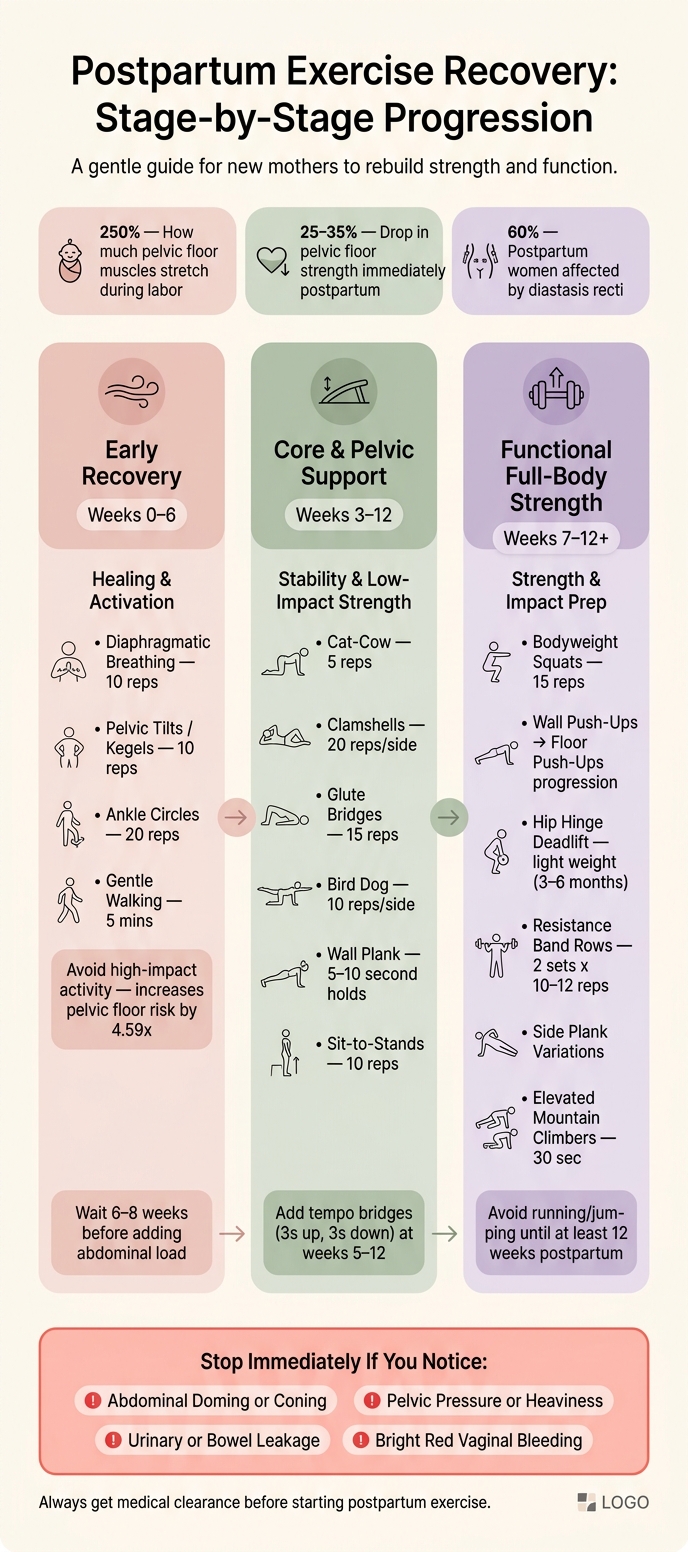
A structured yet flexible plan can make all the difference in your full-body postpartum recovery. Think of these 9 exercises as building blocks you can adjust to fit your needs, rather than a strict program. You’re not required to tackle all of them in one go. Depending on where you are in your recovery, you can create a focused 10–20 minute routine or even break it into shorter sessions. If you’re just starting postpartum exercise, begin with one or two movements and gradually add more as you gain strength. Here's how to tweak sets, reps, and modifications as you progress.
Start every session with 2–3 minutes of diaphragmatic breathing. As Gwen Smith, PT, DPT, emphasizes:
"Diaphragmatic breathing in the immediate postpartum period is the most underrated exercise that every woman should be focusing on."
To do this, inhale slowly, letting your belly and pelvic floor expand and relax. As you exhale, gently pull your belly button toward your spine while lifting your pelvic floor. Use this breathing pattern throughout each exercise - exhale during the effort phase and inhale during the release. This technique helps manage intra-abdominal pressure and protects your pelvic floor.
Once your breathing is on point, move into the exercises. Strength moves like squats and bridges can be done in 1–3 sets of 8–15 reps, while stability-focused exercises like bird dog are best performed in 1–3 sets of 8–12 reps. For static holds, such as planks, aim for 30 seconds, resting for 30 seconds between sets. Start small with just one or two exercises and build up as your body gets stronger.
Keep an eye on diastasis recti by watching for any "doming" in your abdomen during exercises. If you notice firm, raised tissue, scale back the intensity or modify the movement. Avoid traditional crunches until your deeper core muscles have strengthened.
It's also important to progress carefully. According to the American College of Obstetricians and Gynecologists (ACOG), high-impact exercise increases the risk of pelvic floor symptoms by 4.59 times compared to low-impact activities. Gradual progression isn’t just a suggestion - it’s a way to protect your body.
Here’s a quick guide to structuring your routine based on your recovery stage:
| Recovery Stage | Primary Focus | Sample 10–20 Min Structure |
|---|---|---|
| Early (0–6 weeks) | Breathing & gentle activation | 5 min diaphragmatic breathing, 5 min pelvic tilts/Kegels, 10 min gentle walking |
| Mid (6–12 weeks) | Core stability & low-impact strength | 2 min Cat-Cow, 3 sets of bridges & heel slides, 10 min stroller walk |
| Late (12+ weeks) | Functional full-body strength | 2–3 rounds: 15 squats, 12 modified push-ups, 10 lunges/side, 30s plank |
1. Pelvic Floor and Core Connection Bridge
The glute bridge is a great starting point for postpartum recovery. It helps strengthen your glutes, stabilizes your pelvis, and reconnects your deep core with your pelvic floor - two areas heavily impacted by pregnancy and delivery. During labor, the pelvic floor muscles are stretched to an incredible 250% of their resting length, making this reconnection a crucial part of recovery.
Setup: Start by lying on your back with your knees bent and feet flat on the floor, about hip-width apart. Position your heels roughly one hand-length away from your sit bones. Before moving, take a few slow, deep breaths to activate your pelvic floor. As Allison Oswald, PT, DPT, WCS, CPT, explains:
"The pelvic floor lengthens and stretches when we inhale, and it should then contract up and in on our exhale."
The lift: On your exhale, gently engage your pelvic floor - imagine stopping the flow of urine - then press through your heels to lift your hips. Aim for a straight line from your shoulders to your knees. A tip from pelvic floor physical therapists is to imagine "sipping a thick smoothie with your vagina" as you lift. Keep your ribs tucked; if your lower back arches or your ribs flare, reduce your range of motion. Once you’ve nailed the lift, focus on maintaining good form throughout. Watch out for abdominal doming and adjust your movement if needed.
As your recovery progresses, you can modify the bridge:
| Recovery Stage | Bridge Variation | Volume & Cues |
|---|---|---|
| Weeks 3–4 | Double-leg bridge | Up to 30 reps, holding for 5 seconds each, while syncing with your breath |
| Weeks 5–12 | Tempo bridge | Lift for 3 seconds, lower for 3 seconds; perform 15–30 reps |
| Weeks 13+ | Marching or single-leg bridge | Alternate small knee lifts at the top, keeping hips steady |
Stick to these cues as you move through the recovery stages. For those recovering from a C-section, it’s essential to wait about 6–8 weeks postpartum and get clearance from your healthcare provider before adding any abdominal load, as the incision needs to be fully healed.
2. Quadruped Bird Dog for Back, Core, and Balance
The bird dog is a standout postpartum exercise because it works multiple areas at once - your lower back, deep core, glutes, and shoulders - while also improving balance. It’s particularly effective in rebuilding the connection between your core and pelvic floor through postnatal care after pregnancy, and it can even help with diastasis recti, a condition that affects up to 60% of people who become pregnant.
Starting position: Begin on all fours, with your hands directly under your shoulders and your knees aligned under your hips. Keep your back flat and your gaze directed at the floor to maintain a neutral neck position. As you exhale, engage your deep core and pelvic floor muscles to stabilize your body.
Gwen Smith, PT, DPT, at Hinge Health, emphasizes the importance of this foundation:
"As you transition into a workout routine, it's important to have a foundation of core strength before you start body weight or heavier loading exercises with resistance."
The movement: On your exhale, extend one arm and the opposite leg until they’re parallel to the floor. Focus on reaching long from your fingertips to your toes rather than lifting too high, which can cause your lower back to arch. Imagine balancing a cup of water on your lower back to minimize hip rotation. Hold the position for a breath, then return to the starting position with control before switching sides.
Common mistakes include lifting the leg too high (causing the lower back to sag), looking up (which strains the neck), and allowing the belly to "dome" outward at the midline. If you notice doming, adjust your movement to maintain proper form. Once you’ve mastered the basics, try these variations to increase the challenge:
| Progression Level | Exercise Variation | Primary Benefit |
|---|---|---|
| Level 1 | Arms only or legs only | Re-engages core without overloading |
| Level 2 | Standard bird dog | Builds stability in core, hips, and back |
| Level 3 | Tiger tucks (elbow to opposite knee) | Engages rectus abdominis and improves spinal mobility |
| Level 4 | Banded bird dog | Activates deeper stabilizers and glutes |
| Level 5 | Power bird dog (knees hovering 2 inches off the floor) | Challenges core and quads to the max |
3. Supported Postpartum Plank
The supported postpartum plank is a gentle progression designed to strengthen your core while protecting your recovery. It builds on earlier exercises focused on diaphragmatic breathing and core engagement, offering a safe way to regain stability.
While the plank is a powerhouse for full-body stability, jumping straight into a traditional floor plank after giving birth can be overwhelming. Research shows that pelvic floor muscle strength drops by 25–35% immediately postpartum. Starting with an incline - like using a wall, countertop, or bench - eases the strain on your abdominal muscles, making it a safer choice.
How to set up a wall plank: Stand facing a wall and place your hands on it at shoulder height. Step back until your body forms a slight diagonal line. Keep your back flat and your ribs pulled in.
Breathing is the foundation of this exercise. Inhale deeply, allowing your ribs to expand fully. As you exhale, lift your pelvic floor gently and draw your deep abdominal muscles toward your spine. Exhale slowly through pursed lips to activate the transverse abdominis and pelvic floor. Roselyn Reilly, Facility Leader and Trainer at Fit Body Boot Camp, emphasizes:
"The most important thing in the postpartum period is getting core strength back... focus on the diaphragm, transverse abdominis muscles, and the pelvic floor."
Begin with 5–10 second holds, focusing on maintaining steady breathing and core engagement rather than aiming for longer durations. As you gain strength and control, you can gradually lower the incline. Here’s a guide to advancing safely:
| Recovery Stage | Plank Variation | Focus |
|---|---|---|
| Early (0–6 weeks) | Wall Plank (high incline) | Reconnecting breath to pelvic floor and deep abs |
| Intermediate (6–12 weeks) | Incline Plank (bench or chair) | Building endurance and managing intra-abdominal pressure |
| Advanced (3–6 months+) | Floor Plank (knees or toes) | Full-body stability and functional strength |
If you experience any signs like coning, doming, tenting, urinary leakage, pelvic heaviness, lower back pain, or bright red vaginal bleeding, stop immediately and return to a higher incline to rebuild strength.
As you grow more comfortable with this exercise, continue adjusting the incline to safely challenge your core and progress at your own pace.
4. Side Plank with Hip and Leg Variations
The side plank is a great core exercise that strengthens your obliques and deep spinal stabilizers without straining your midline. This makes it especially helpful for people dealing with diastasis recti, which affects up to 60% of postpartum women. By building on foundational core exercises, this variation focuses on obliques and deep stabilizers that are crucial for postpartum recovery. It also targets the quadratus lumborum, a deep spinal muscle that helps prevent postpartum back pain. This progression introduces lateral stability challenges, making it a natural next step in recovery.
Start with the knee-down version. Lie on your side, propped up on your forearm, with your bottom knee resting on the floor and your hips raised. Your body should form a straight line from your head to your top knee. This shorter lever reduces pressure on your core and pelvic floor while still activating your obliques and glutes. Since relaxin levels can remain high for 3 to 6 months postpartum (or longer if breastfeeding), controlled movements help protect your joints as you rebuild strength.
Once you can hold the knee-down plank for 30 seconds per side, you can move to more advanced variations. The table below outlines how to progress safely:
| Variation | When to Try It | Primary Muscles |
|---|---|---|
| Knee-Down Side Plank | Early recovery (0–6 weeks post-clearance) | Obliques, transverse abdominis |
| Full Side Plank | 6–12 weeks, once foundational strength is established | Obliques, hip abductors, shoulders |
| Hip Dips | After mastering the full plank hold | Obliques, glutes, shoulders |
| Leg Lifts | 6–8 weeks post-delivery or later, advanced stage | Gluteus medius, obliques |
These variations let you gradually increase the difficulty as your strength improves. Like earlier exercises, this progression builds core stability without overloading the healing midline.
For all variations, exhale during the hardest part, such as lifting your hips or raising your leg. Keep your hips aligned and make sure your forearm is directly under your shoulder. If you notice any doming along your midline, pelvic heaviness, or leaking, stop immediately and return to the knee-down version.
5. Chair or Wall Squat with Baby Hold
The squat is a powerhouse exercise, perfect for building strength and balance - two things every new parent needs. Think about it: everyday activities like lifting your baby or simply sitting down rely on this movement. That’s why squats are such a practical choice for postpartum recovery.
"Squatting is a great way to start to regain strength in a functional way whilst working the pelvic floor muscles…in our opinion it is the single most important movement to master." - CARiFiT experts, Baby Mori
How to Get Started: Stand with your back against a wall, feet shoulder-width apart and slightly turned out. Slowly lower yourself into a squat, aiming for a shallow depth at first (about 25%). As you get stronger, you can go deeper. This move strengthens your lower body while also promoting pelvic stability - essential for postpartum healing.
When you lower into the squat, inhale. As you rise, exhale and focus on drawing your hip bones together to activate your core. Use the same pelvic floor and breathing techniques mentioned earlier. Be mindful not to rely too much on your thighs or glutes; instead, focus on engaging your core from within.
Once your baby has developed head and neck control, you can hold them during the exercise. This adds natural resistance and creates an opportunity for bonding. Aim for 12–15 repetitions per set, but listen to your body. Stop immediately if you notice increased pelvic pressure, leaking, or sharp abdominal pain.
Up next, we’ll dive into dynamic movements that complement the strength you’ve built with squats.
6. Hip Hinge Deadlift Pattern with Light Weight
Every time you bend to pick up your baby, grab a car seat, or reach into a crib, you're performing a hip hinge. This movement is a key part of postpartum recovery and daily life.
"Your center of gravity pulls you forward when you're pregnant, so the posterior chain tends to turn off... working the hamstrings and the glutes is really important to build back muscle balance and reverse postural changes." - Michelle Grabau, Fitness Programming Director at Tonal
How to do it: Start with your feet hip-width apart and keep your back straight. Push your hips backward as you lower your hands toward the floor. Then, press through your heels to return to a standing position. Make sure the movement feels smooth and controlled before introducing any weight.
When you're about 3–6 months postpartum, you can add light resistance. Use a dumbbell, a water jug, or even your baby as weight. Keep the weight close to your body to protect your lower back, and remember to exhale as you stand, as previously mentioned.
Be mindful of your body. Stop immediately if you notice pelvic heaviness, urinary leaking, or doming/coning along the midline of your abdomen. These are signs that your core isn't ready for increased load. If this happens, go back to foundational exercises like glute bridges to build strength gradually.
Getting comfortable with this hip hinge movement sets the stage for more advanced, loaded exercises in the future.
7. Supported Push Movement for Upper Body and Core
Everyday tasks like nursing, carrying your baby, or pushing a stroller can put a lot of strain on your chest, shoulders, and arms. Over time, this can lead to a forward-slumped posture. A supported push movement is a great way to counteract this strain and rebuild the pressing strength you use daily.
Start with wall push-ups. Stand facing a wall and place your palms flat at shoulder height, slightly wider than your shoulders. Step your feet back until you're leaning forward at a slight angle. As you inhale, lower your chest toward the wall. Exhale as you press back, engaging your deep core muscles to manage internal pressure. Once you’re comfortable with this, you can lower the support surface to make the exercise more challenging.
"Wall push-ups are a safer alternative in the early postpartum phase, offering less strain on the abdominal area, especially important for mothers who experienced diastasis recti or had a C-section." - Curezone Physiotherapy
When performing this movement, focus on maintaining a straight alignment. Keep your ears over your shoulders, your hips level, and your elbows at a 30–45 degree angle from your body. Avoid flaring your elbows out. Jen Comas, Head Coach at Girls Gone Strong, explains:
"Think of placing a broomstick down your back... that imaginary broomstick should maintain contact with your body in three places: the back of your head, your upper back, and your tailbone."
This supported push movement not only builds upper-body strength but also complements core and lower-body exercises, helping to reinforce proper posture for everyday activities.
When you can complete 3 sets of 15–20 wall push-ups, it’s time to progress. Start with a kitchen countertop, then move to a bench or couch edge, and finally work your way to the floor. Here’s how the load changes as you lower the surface:
| Level | Surface | Approx. Body Weight Supported |
|---|---|---|
| 1 | Wall | ~9% |
| 2 | Countertop | ~20% |
| 3 | Bench or couch edge | Moderate increase |
| 4 | Floor (standard) | ~64% |
This gradual progression allows you to build strength safely while protecting your core.
Be mindful of your body as you progress. Stop if you notice doming or coning along your midline, pelvic pressure, or any leaking. Dr. Sarah Ellis Duvall, DPT, CPT, advises: "If you notice any 'doming' or 'coning' at your midline during a push-up, it's a sign that your core isn't yet able to manage the pressure of that exercise." If this happens, return to a higher surface and continue building strength from there.
8. Supported Row or Pull Movement
The supported row is a great way to counteract the posture issues caused by hours of nursing, feeding, and carrying your baby. These activities can weaken your upper back and create imbalances that often lead to neck and shoulder discomfort. A supported row works the rhomboids, trapezius, and biceps, which are key to keeping your shoulders back and maintaining an upright posture.
To get started, try a resistance band row. Anchor a resistance band to a sturdy door handle or fixed post, holding one end in each hand. Stand with your feet hip-width apart, hinge slightly at the hips, and maintain a neutral spine - keep your ribs down and avoid arching your lower back. Pull your elbows back toward your hips, squeezing your shoulder blades together at the peak of the movement. Exhale as you pull, and inhale as you release. If you don’t have a resistance band, grab two full water bottles as an alternative. For an added challenge, you can try the half-kneeling variation.
"So often, you are doing something with one arm while you hold your baby on your hip with another. This postpartum exercise also challenges your unilateral strength and core stability." - Michelle Grabau, Fitness Programming Director, Tonal
The half-kneeling variation takes things up a notch. Drop one knee to the floor and use just one arm to row. This setup forces your core to stabilize your body, mimicking the way you hold your baby on one hip while reaching with the other. It’s also a great way to identify and address any one-sided muscle imbalances that may develop from favoring the same arm repeatedly.
Resistance rows are typically introduced around 3 to 6 months postpartum, starting with 2 sets of 10–12 repetitions at light resistance. Pay close attention to your midsection - if you notice doming or bulging, stop immediately. Similarly, discontinue the exercise if you experience pelvic heaviness or leakage. Only increase resistance when your form remains consistent and controlled.
"Pulling elbows back, squeezing shoulder blades... counters the forward hunch from holding baby all day." - Be One Strong Mother
This movement builds the strength you need for everyday tasks like lifting and carrying your baby, helping you feel more balanced and supported in your daily routine.
9. Gentle Mobility and Cooldown Sequence
Cooling down is just as important as the workout itself when it comes to postpartum recovery. After strength exercises, taking time to wind down helps normalize your heart rate and blood pressure. According to the American Heart Association, dedicating 5 to 10 minutes to a cooldown can prevent issues like blood pooling in your legs, which might leave you feeling dizzy or lightheaded.
"Don't look at cooling down as an extra step. Look at it as part of your workout - because it is!" - Megan Grant, Author, Tempo
Start with diaphragmatic breathing to center yourself. Lie on your back, placing one hand on your chest and the other on your belly. Slowly inhale through your nose, letting your belly rise, and exhale through your mouth, allowing it to fall. This type of breathing not only calms your mind but also helps reset your pelvic floor - relaxing it on the inhale and re-engaging it on the exhale. Once your breathing feels steady, ease into a series of stretches.
Here are three mobility stretches to incorporate:
- Half-Kneeling Hip Stretch: Kneel on one knee, tuck your hips slightly, squeeze the glute of the kneeling leg, and gently lean forward to stretch your hip flexors.
- Open Books: Lie on your side with your knees stacked. Extend your top arm and rotate your chest open as you inhale, then return to the starting position as you exhale.
- Doorway Pec Stretch: Stand in a doorway with your arms at shoulder height. Lean forward slightly to stretch your chest and shoulders.
Hold each stretch for 10 to 30 seconds, keeping the movements smooth and controlled - no bouncing. These stretches are designed to release tension and prepare your body for final calming movements.
Wrap up your routine with a Cat-Cow stretch for 60 seconds. As you inhale, arch your back (Cow), and as you exhale, round your spine (Cat). This helps improve circulation along your spine and eases any lingering lower back stiffness. Finally, settle into Child's Pose for up to 5 minutes, breathing deeply into the back of your ribcage to release tension in your hips and lower back.
"Each stretch or movement, no matter how small, chips away at discomfort and brings a wave of relief." - Heather Jeffcoat, DPT, Founder, Femina Physical Therapy
Here’s a quick guide to the full sequence:
| Movement | Target Area | Breathing Cue |
|---|---|---|
| Diaphragmatic Breath | Core & Pelvic Floor | Inhale: Belly expands; Exhale: Belly sinks |
| Half-Kneeling Hip Stretch | Hip Flexors | Inhale to prepare; Exhale to deepen stretch |
| Open Books | Thoracic Spine | Inhale: Rotate open; Exhale: Return to start |
| Doorway Pec Stretch | Shoulders & Chest | Slow, steady breaths throughout |
| Cat-Cow | Spine & Core | Inhale: Arch back; Exhale: Round spine |
| Child's Pose | Hips & Lower Back | Deep breaths into the back of the ribcage |
Sample Mini-Routines by Recovery Stage
Postpartum Exercise Recovery Stages: Week-by-Week Progression Guide
Postpartum recovery typically happens in stages: early healing, strength building, and advanced conditioning. These 10–15 minute routines, adapted from the exercises discussed earlier, are tailored to fit each stage of recovery.
| Recovery Stage | Focus | Sample 10–15 Minute Routine |
|---|---|---|
| Early (Weeks 0–2) | Healing & Activation | Diaphragmatic breathing (10 reps), Pelvic tilts (10 reps), Ankle circles (20 reps), Gentle walking (5 mins) |
| Building (Weeks 3–6) | Core & Pelvic Support | Cat-Cow (5 reps), Clamshells (20 reps/side), Glute bridges (15 reps), Sit-to-stands (10 reps) |
| Advanced (Weeks 7–12) | Strength & Impact Prep | Bodyweight squats (15 reps), Bird-Dog (10 reps/side), Wall sit (30 sec), Elevated mountain climbers (30 sec) |
These routines are designed to help you progress gradually through recovery while focusing on the needs of each stage.
In the early weeks, the focus is on healing and reconnecting with your body. Exercises like diaphragmatic breathing and pelvic floor activation are essential for laying the foundation for future strength. High-impact activities, such as running or jumping, should be avoided until at least 12 weeks postpartum to allow the pelvic floor sufficient time to recover.
During the building phase, exercises supporting the core and pelvic region become the priority. A simple way to gauge intensity: aim to feel slightly out of breath but still able to hold a conversation. If you notice any coning or bulging along your midline while doing core exercises, take a step back and reduce the intensity.
"Instead of rushing back into jogging or running, allow your body to rest and heal and focus on building up your foundation with diaphragmatic breathing and other gentle exercises." - Gwen Smith, PT, DPT, Hinge Health
Time is often the biggest hurdle for postpartum recovery. Caring for a newborn can feel all-consuming, making it tough to find even 10 minutes for yourself. That’s why having the right support system is so important. Services like Nestling connect families with postpartum doulas and infant care specialists who can manage tasks like newborn care, feeding support, and light household work. This support can free up the time and energy you need to prioritize your recovery.
When to Seek Professional Help
As you ease into postpartum exercises, it's important to pay attention to your body's signals. While these exercises are generally safe, some symptoms may indicate the need for professional care. For example, more than 1 in 4 women experience pelvic floor dysfunction, such as incontinence or prolapse, but many delay treatment, believing these issues are just part of recovery. These challenges are common, but they don't have to define your postpartum experience. Knowing when to seek expert help can make all the difference.
Here are some signs to watch for during or after exercise:
- Urinary or bowel leakage, even if it's just minor and happens during movement or daily activities.
- Pelvic pressure or heaviness, a dragging sensation, or visible bulging or pressure in the vaginal area.
- "Doming" or "coning" along the midline during core exercises, or an abdominal gap that remains obvious 8 weeks after giving birth.
- Ongoing pain in the lower back, hips, pelvis, or abdomen that disrupts daily activities like lifting or bending.
- Pain during urination, bowel movements, or sexual activity.
If you notice any of these symptoms, seeking professional evaluation can help manage your recovery effectively. Rachel Selman highlights the importance of acting promptly:
"The lack of distinction between common versus normal symptoms in the first three months postpartum often delays appropriate management despite evidence that physical therapy can be beneficial in preventing and resolving these symptoms." - Rachel Selman, PT, DPT, CSCS, Benchmark Physical Therapy
A pelvic floor physical therapist can provide targeted rehabilitation for issues like leakage, prolapse, or diastasis recti. For more complex concerns, consulting a urogynecologist - specializing in female pelvic health and reconstructive care - may be necessary. Your OB-GYN or general practitioner can also perform an initial evaluation and refer you to the right specialist. Be sure to bring up any concerns during your 6-to-8-week postnatal checkup.
If you need additional support, Nestling connects you with trusted postpartum specialists who can help with both physical recovery and emotional well-being. Personalized care can make it much easier to navigate the challenges of new motherhood and stay on track with professional treatment when needed.
Conclusion
Postpartum recovery is about regaining strength and prioritizing overall well-being. As certified personal trainer Lindsey Bomgren, CPT, explains:
"The goal isn't to 'bounce back' – it's to reconnect and rebuild."
The 9 exercises outlined in this guide are designed to help you rebuild strength step by step. They focus on improving core stability, relieving common postpartum aches, and supporting mental health. According to the American College of Obstetricians and Gynecologists, staying active during the postpartum period can help reduce stress and may lower the risk of postpartum depression.
Take your time, listen to your body, and seek professional guidance if needed. Platforms like Nestling can connect you with trusted specialists, such as postpartum doulas and recovery experts, to create a care plan tailored to your needs.
FAQs
When is it safe to start postpartum exercise?
It’s usually okay to start postpartum exercise just a few days after an uncomplicated vaginal birth - if you feel ready. That said, it’s crucial to check with your healthcare provider first, especially if you’ve had a cesarean delivery or experienced any complications. Begin with gentle, low-impact activities, pay attention to how your body feels, and slowly build up the intensity as you heal.
How do I know if an exercise is too hard postpartum?
Listen closely to your body and take note of any warning signs, such as vaginal bleeding, abdominal pain, or pelvic discomfort. These are clear signals to stop and reach out to your healthcare provider. Additional signs like extreme fatigue, pain, or worsening pelvic discomfort also shouldn't be ignored.
When starting postpartum exercises, begin with gentle, low-impact movements and slowly increase the intensity over time, making sure no new discomfort develops. Always check with your provider before beginning any postpartum workout routine, especially if you're dealing with any concerning symptoms.
When can I return to running or jumping after birth?
There’s no one-size-fits-all timeline for when you can return to running or jumping after giving birth. Your recovery and fitness levels play a big role in determining when it’s safe to resume these activities. In most cases, starting with low-impact exercises like walking is a good idea, slowly building up intensity over time. Many women might feel ready for high-impact workouts around 4–6 months postpartum, but it’s crucial to check in with your healthcare provider or a postpartum physical therapist first. This helps ensure your body is ready and reduces the risk of injuries or pelvic floor complications.